
I have an older post on how to convert mp4 to webm on Mac OSX but it looks like it is out of date now. Installing ffmpeg with libvpx and libvorbis with webm support got way more challenging from Serria to Mojave…
Pregame Warning: I don’t want to push paid video conversion software but if you want to skip the headache, it might be worth it if you have no time/lots of money. Ask your dentist for recommended media conversion apps. 😛
Reach out to me if you know some good ones.
I’ve been making more HTML5 Videos for that cool background video effect on my clients websites. You have to have two versions of the video cover all browsers HTML5 video support. An mp4 version and a webm version.
Checkout this article for more on the HTML5 Video Tag.
It is hard to find something free out there to convert an mp4 to a webm format. You would think things like Adobe Premiere, VLC, or HandBreak would support this conversion and video codec but sadly I couldn’t see a way to do it. Looks like most of these programs use ffmpeg under the hood to do the actual video conversion. However if you install ffmpeg via brew or other sources, you’ll notice it is missing webm video codec support. The only way now it seems is to compile ffmpeg with libvpx/libvorbis enabled. My bet would be on the reason why vpx/vorbis isn’t bundled with ffmpeg anymore would be licensing issues. I didn’t really look into why it isn’t but I did find a way to get it working on Mac!
Using a few resources online, I was able to compile and convert my MP4 video to a webm video. I also learned some new things in the process!
Here are the steps that worked for me on my OSX Mojave MacBook Pro:
This next step is optional but I recommend it. Install HandBreak and compress a “web optimized” mp4 with Fast 1080p. Even if you already have an MP4 video, it probably isn’t compressed and very large for the web. Once you have HandBrake installed, select your source video and check off the Web Optimized checkbox, then hit start to compress it. Now you can use this smaller MP4 as the source for your MP4 HTML 5 Video. The HandBrake screen should look like this:

Well that was easy for mp4 but getting the webm version of your HTML5 video is going to require way more effort… Your gonna need to get “developer” with things at this point by running some terminal commands but they should be clean to run and won’t require programming experience – esp if you follow my instructions 😉
- Install HomeBrew
- Install XCode (run the following in your terminal)
xcode-select --install - Install Dependencies with HomeBrew
brew install automake fdk-aac git lame libass libtool libvorbis libvpx opus sdl shtool texi2html theora wget x264 x265 xvid nasm pkg-configIf you don’t want to install dependencies with homebrew, there are manual ways as stated in the ffmpeg compile docs.
- Next we need to compile ffmpeg with vpx/vorbis support. Run the following in your terminal to compile it. I ran all of this in my /tmp directory.
git clone https://git.ffmpeg.org/ffmpeg.git ffmpeg
cd ffmpeg
./configure  --prefix=/usr/local --enable-gpl --enable-nonfree --enable-libass
--enable-libfdk-aac --enable-libfreetype --enable-libmp3lame
--enable-libtheora --enable-libvorbis --enable-libvpx --enable-libx264 --enable-libx265 --enable-libopus --enable-libxvid
--samples=fate-suite/
make
If all goes well, it should be compiled at this point. Now run the final command to install the ffmpeg binary -> sudo make install
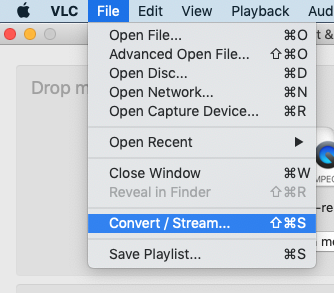
Now you should have an ffmpeg with webm support. At this point you can use VLC to convert the video if you want a GUI experience. If you want to use the ffmpeg command directly in your console, skip this VLC part.
You can install VLC, click File -> Convert / Stream, and select the raw mp4 video file.
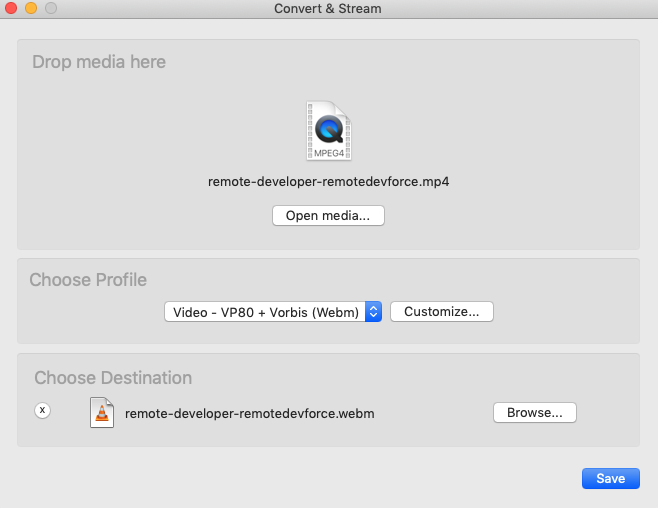
If you went the VLC route, you should be done!
However, you don’t need to use VLC if you are a terminal junkie like me. We can run the ffmpeg command directly to convert our video:
ffmpeg  -i input.mp4  -b:v 0  -crf 30  -pass 1  -an -f webm /dev/null
ffmpeg  -i input.mp4  -b:v 0  -crf 30  -pass 2  output.webm
I’m using the 2 pass Constant Quality mode to compress the raw source video. Do not use the MP4 compressed version you made earlier, use the original video you have so you are not compressing a compressed video. The first ffmpeg command here is doing a pass to see how best to compress the video and casting the output of the video into the fiery depths of /dev/null which is basically a digital blackhole . The 2nd command is actually given a real filepath as the output webm version of the video.
And That’s It! You should be all ready to go with your two video files. I’m using Divi to insert my videos in the background of my hero banners on some sites and they turned out great.
PS. If you need a web developer, checkout my company Remote Dev Force. Whether you need an elite team of software engineers or just a single talented individual, we’ve got you covered. We do projects of all sizes and have experienced developers and software architects that you can hire for any period of time.
Hi there, thanks for this detailed tutorial. However I’m getting a couple of errors.
firstly this:
Stefans-iMac:ffmpeg stefan$ ./configure –prefix=/usr/local –enable-gpl –enable-nonfree –enable-libass
ERROR: libass not found using pkg-config
Secondly this:
-bash: –enable-libfdk-aac: command not found
Stefans-iMac:ffmpeg stefan$ –enable-libtheora –enable-libvorbis –enable-libvpx –enable-libx264 –enable-libx265 –enable-libopus –enable-libxvid
-bash: –enable-libtheora: command not found
Stefans-iMac:ffmpeg stefan$ –samples=fate-suite/
-bash: –samples=fate-suite/: No such file or directory
Stefans-iMac:ffmpeg stefan$ make
Makefile:2: ffbuild/config.mak: No such file or directory
Makefile:40: /tools/Makefile: No such file or directory
Makefile:41: /ffbuild/common.mak: No such file or directory
Makefile:94: /libavutil/Makefile: No such file or directory
Makefile:94: /ffbuild/library.mak: No such file or directory
Makefile:96: /fftools/Makefile: No such file or directory
Makefile:97: /doc/Makefile: No such file or directory
Makefile:98: /doc/examples/Makefile: No such file or directory
Makefile:163: /tests/Makefile: No such file or directory
make: *** No rule to make target `/tests/Makefile’. Stop.
Stefans-iMac:ffmpeg stefan$
Please could I get some help in makin this work. It would be much much appreciated!
Best Regards, Stefan
Hi! First of all: thanks for the tutorial. But I have the same problem as Stefan Iyapah. Any ideas?
Verify `pkg-config –libs libass` and `pkg-config –cflags libass`.
You should notice somewhat similar,
$ pkg-config --libs libass

-L/usr/local/Cellar/libass/0.13.1/lib -lass
$ pkg-config --cflags libass
-I/usr/local/Cellar/libass/0.13.1/include -I/usr/local/Cellar/harfbuzz/1.1.2/include/harfbuzz -I/usr/local/Cellar/glib/2.46.2/include/glib-2.0 -I/usr/local/Cellar/glib/2.46.2/lib/glib-2.0/include -I/usr/local/opt/gettext/include -I/usr/local/Cellar/fontconfig/2.11.1/include -I/usr/local/Cellar/freetype/2.6_1/include/freetype2 -I/usr/local/Cellar/fribidi/0.19.7/include/fribidi -I/usr/local/Cellar/freetype/2.6_1/include/freetype2
If not, then reinstall libass,
$ brew rm libass && brew install libass

$ brew ls libass

/usr/local/Cellar/libass/0.13.1/include/ass/ (2 files)

/usr/local/Cellar/libass/0.13.1/lib/libass.5.dylib

/usr/local/Cellar/libass/0.13.1/lib/pkgconfig/libass.pc

/usr/local/Cellar/libass/0.13.1/lib/ (3 other files)
Found this from https://github.com/Homebrew/legacy-homebrew/issues/46992
@Stefan Iyapah @Eneko
you’re could be missing pkg-config, as it’s not installed by following instructions
brew install pkg-config
should fix it!
@Josh maybe we could include it too? Thanks for this post btw!
Updated!